
You click a product page on a WordPress store and wait. The photo loads a piece at a time, top to bottom. Three seconds pass. Then five. You leave before the page finishes.
That scene plays out thousands of times a day across WordPress sites, and product images are almost always the reason. According to HTTP Archive data, images account for over 1 MB of the median desktop webpage’s transferred data, making them the single biggest contributor to page weight on most sites.
Here’s what a single round of proper compression looks like on one real product photo:
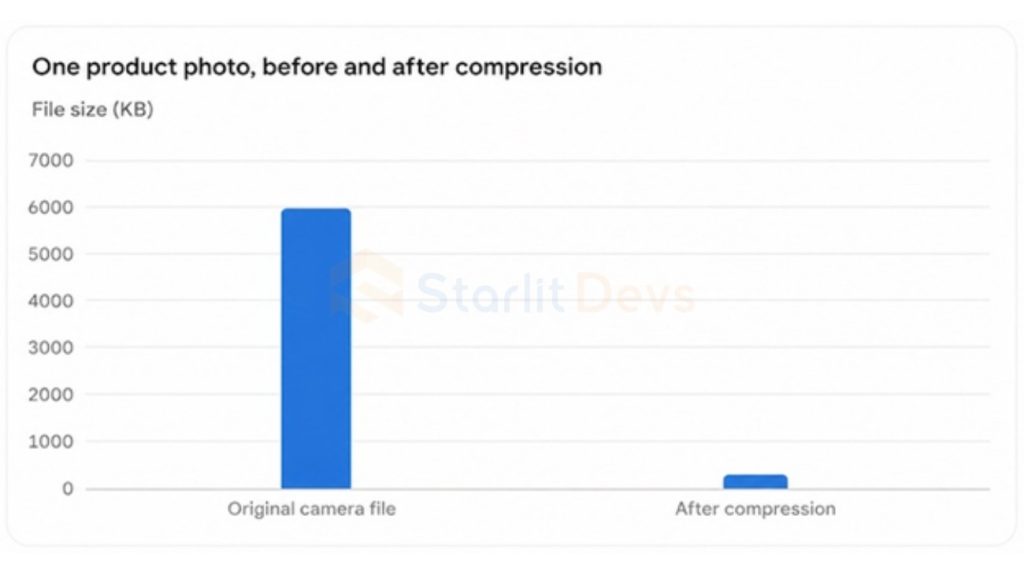
That’s a 96% drop in file size, and the compressed version still looks sharp on a product page.
This guide covers image compression
best practices for WordPress from that starting point through to the details most guides skip entirely: how to confirm compression actually worked, what cloud-based compression tools do with your files, and how image optimization now affects AI-powered search results.
What Is Image Compression
Image compression reduces the file size of an image. The goal is simple: make the file smaller so it stores more easily and loads faster, without changing what the image looks like to a visitor.
The chart above shows the real range you can expect. A product photo straight off a camera runs several megabytes. After compression, that same photo often drops under 300 KB while looking almost identical on screen. The pixels shift or disappear in ways your eye barely registers, but the file transfers in a fraction of the time.
This matters for every WordPress site carrying photos, screenshots, or graphics, and it matters more the bigger your media library gets.
Why Image Compression Matters for WordPress Sites
Website speed changes user behavior in measurable ways. Google’s own mobile performance research found that the probability of a visitor bouncing rises by 32 percent when load time grows from one second to three seconds. Image-heavy pages hit that threshold fast without compression in place.
- Faster page load times. Every image adds weight. Ten images at 2 MB each add up to 20 MB of data on a single page. On a mobile connection, that download drags on. Compressed images cut the data transferred and get your page rendering sooner.
- Better user experience. Visitors don’t wait around for a slow page. They browse products, check search results, scroll category pages, and move through checkout, and each of those steps feels smoother when images load fast. A faster experience usually means more completed purchases.
- Improved mobile performance. Most shoppers browse on a phone now, often on a connection that ranges from strong to unreliable depending on where they stand. Smaller image files help mobile visitors load your pages faster and use less of their data plan doing it.
- Lower bandwidth costs. Hosting providers and CDNs often bill based on bandwidth. Serving smaller images cuts your data transfer and can lower your hosting bill directly.
- Better SEO signals. Search engines treat page speed as a ranking factor. A faster site competes better against similar stores in the same category, and image compression is one of the fastest ways to move that needle.
If you’re addressing WordPress performance as a whole, image compression belongs near the top of your list, not as an afterthought.
Lossy vs Lossless Compression: The Real Difference
Most confusion about image compression comes down to this one distinction. Here’s the plain version, and the numbers behind it.
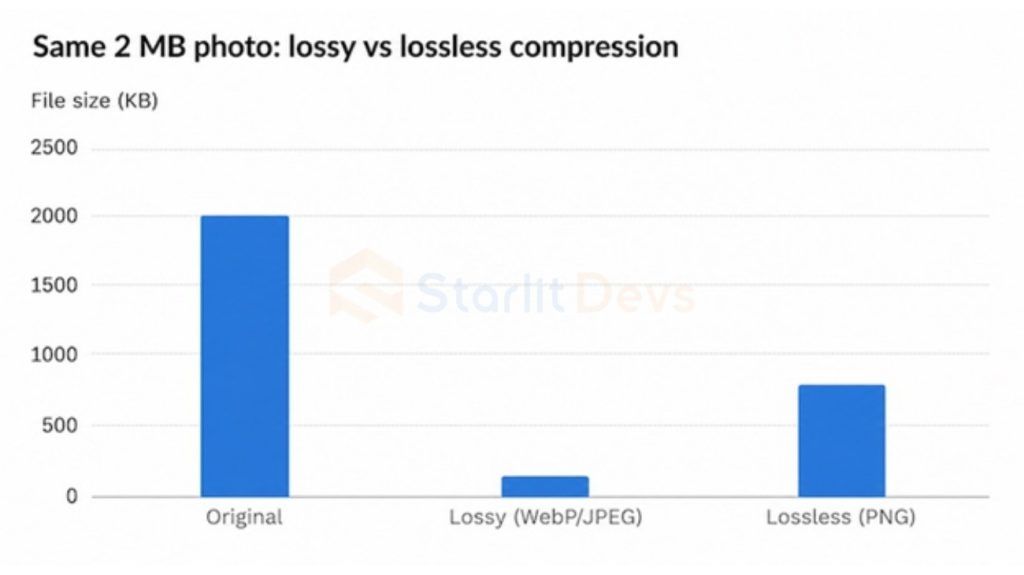
That gap explains why the two methods exist for different jobs.
What Is Lossy Compression
Lossy compression removes some image data permanently. The file shrinks a lot, and a small amount of detail disappears with it. Done well, that loss stays invisible during normal viewing.
Pros: much smaller file sizes, faster loading pages, strong results for photos and product images.
Cons: repeated editing and re-saving gradually reduces quality, and the method isn’t suited to cases needing pixel perfect accuracy.
What Is Lossless Compression
Lossless compression shrinks a file without removing any image data. Decompressed, the image matches the original exactly.
Pros: no quality loss at all, and a strong fit for logos, screenshots, and graphics with sharp edges.
Cons: file sizes stay larger than lossy alternatives, and results on photographic content stay weaker by comparison.
Most image compression best practices for WordPress point toward lossy compression as the default choice, since the quality difference stays invisible while the size difference shows up on every speed test you run.
Image Format Comparison Table
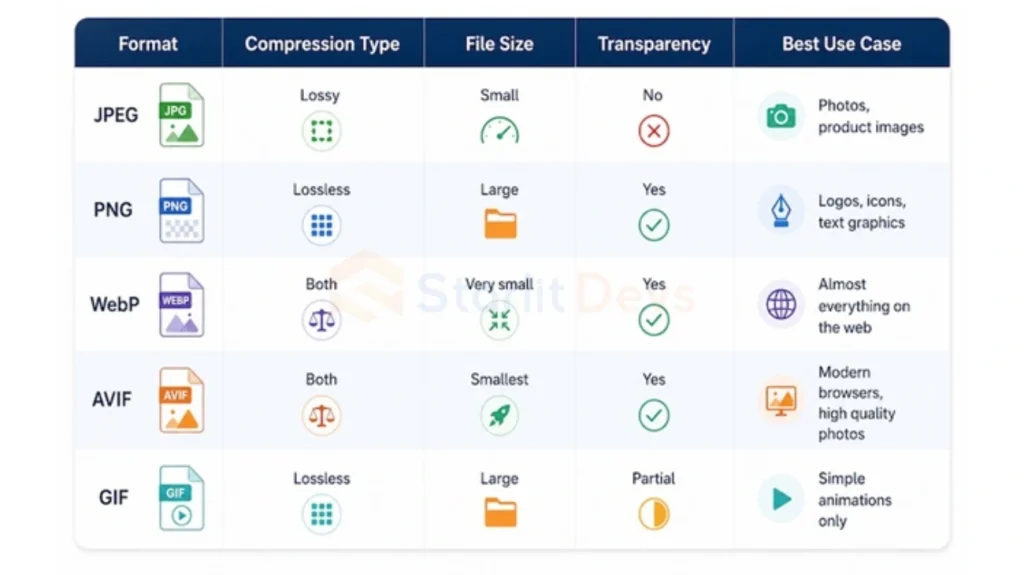
WebP now handles the job JPEG and PNG used to split between them, and it does it in a smaller file. AVIF pushes further still, though it needs more processing time to encode and some older tools in the WordPress ecosystem still handle it inconsistently. Serve AVIF with a WebP and JPEG fallback so nobody sees a broken image.
Not sure which format fits a given upload? Here’s the short version:
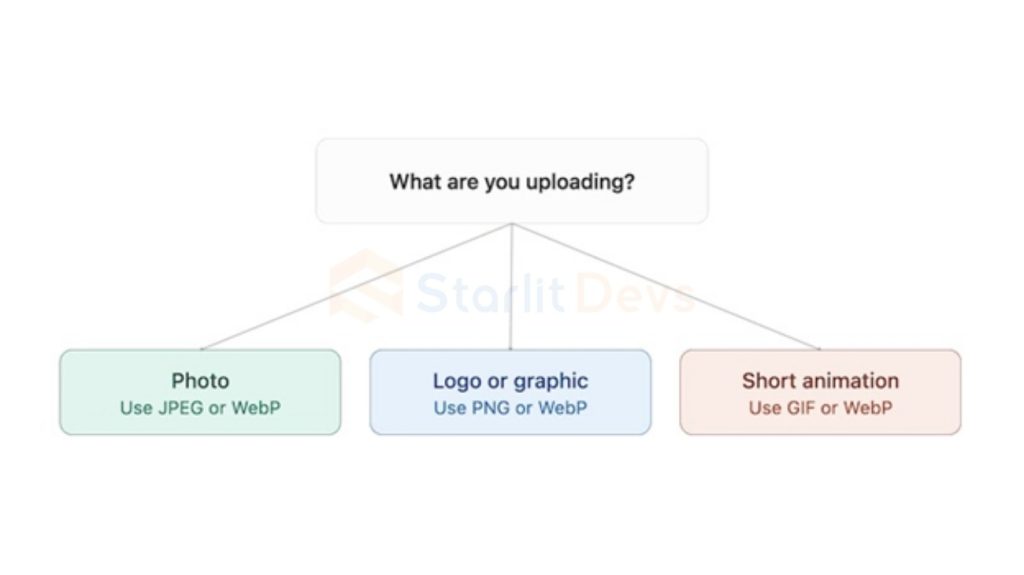
When WebP fits your theme and plugin setup, default to it across all three branches. Fall back to the format shown only when something in your stack doesn’t support WebP yet.
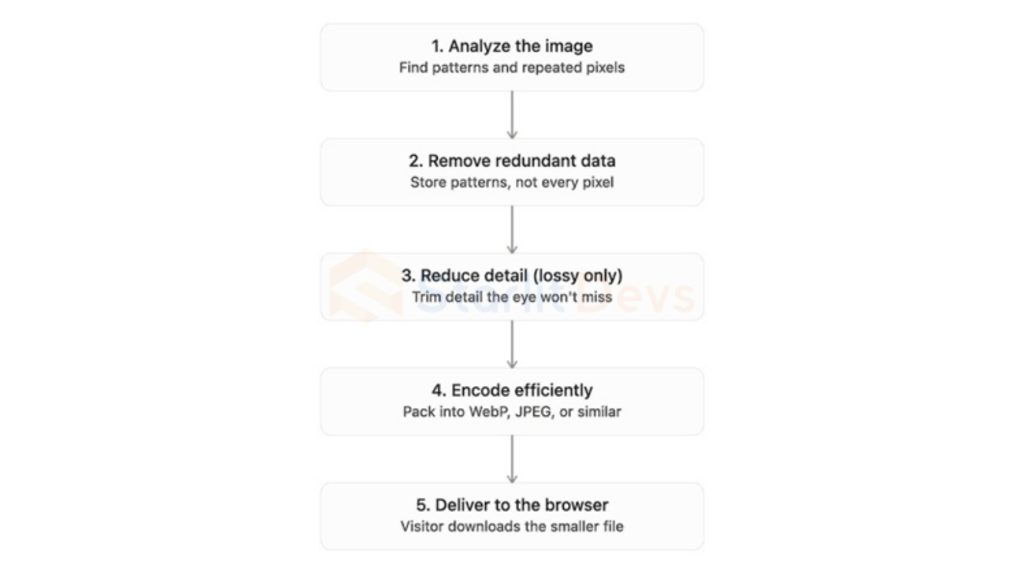
How Image Compression Actually Works, Step by Step
Most articles skip this part or make it sound complicated. Here’s what a compression tool actually does to your file, laid out as a pipeline.
Three Ways to Compress Images in WordPress
Once you understand the process, the method you choose matters less than picking one and sticking with it consistently.
Bulk compression handles your existing media library in one pass. Instead of opening and re-saving hundreds of files individually, a bulk tool scans your library, flags anything unoptimized, and processes it in batches. This works well the first time you set up compression on an established site with years of uploads sitting in the media library.
Compress on upload handles new images automatically the moment they land in your media library. Once you turn this setting on, you stop thinking about compression entirely for anything you publish going forward. This suits sites that publish often, since it removes the manual step completely.
Single image compression gives you control over one file at a time. This suits a case where you need to compress a single photo without touching the rest of your library, or where you want to check the result on one image before running a bulk pass on everything else.
Most WordPress compression plugins offer some combination of these three options. Check which combination a plugin supports before installing it, since a tool missing compress on upload leaves you doing manual work every time you publish.
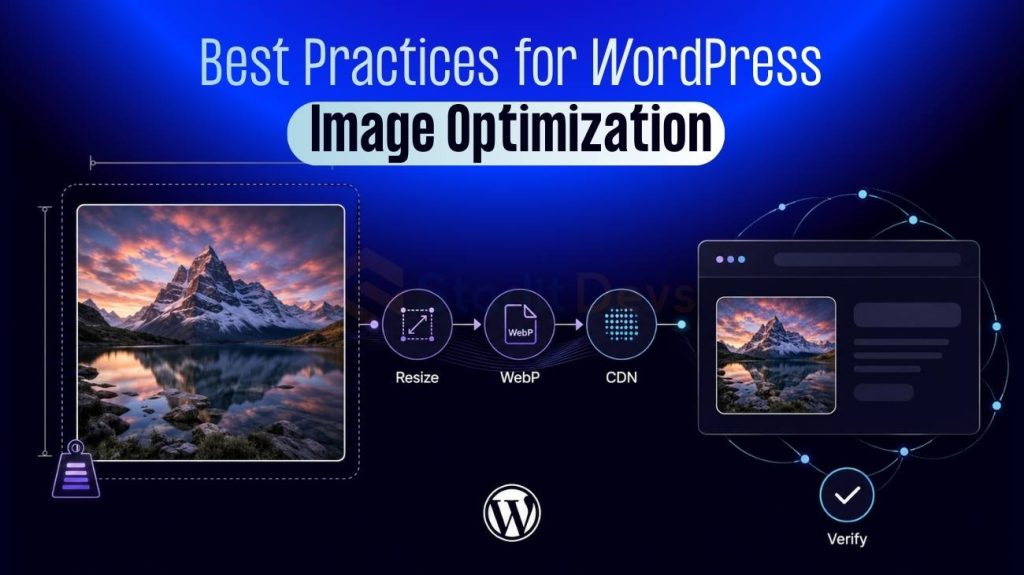
Best Practices for WordPress Image Optimization
Resize before uploading. Don’t upload a 4000-pixel-wide image if your theme displays it at 800 pixels. Resize first, then compress. This single habit often saves more file size than compression alone, since you’re not asking a compression tool to shrink pixels your visitors never see displayed at full size.
Use modern formats. Serve WebP or AVIF wherever your theme and plugin support it. These formats run 25 to 50 percent smaller than an equivalent JPEG at matching quality, with no visible difference to a normal visitor.
Choose reasonable quality settings. For most product photos, a WebP quality setting between 70 and 85 keeps the image sharp while cutting file size hard. The same range works for JPEG. Pushing quality above 90 adds file size fast while giving you almost nothing visible in return.
Enable lazy loading correctly. Lazy loading delays images below the fold until a visitor scrolls near them, cutting how much data your page downloads on first load. WordPress handles this natively since version 5.5. One mistake breaks the benefit completely: lazy loading your hero image, the large photo sitting above the fold on page load. That image needs to appear immediately, so delaying it raises your Largest Contentful Paint score instead of lowering it. Exclude your hero image and featured image from lazy loading before turning the feature on for your whole site.
Use a CDN alongside compression. A content delivery network stores copies of your images on servers spread around the world, so a visitor in another country pulls files from a nearby server instead of your original host. Compression shrinks the file. A CDN shortens the trip. Running both together gets you the biggest gain, and several WordPress hosts now bundle a CDN directly into hosting plans.
Verify compression actually worked. This step gets skipped almost everywhere. Seeing a percentage saved number in your plugin dashboard confirms your file shrank on disk. It doesn’t confirm your site got faster where visitors feel it, on a real mobile connection. Run your homepage and your busiest product page through PageSpeed Insights or GTmetrix before compressing, then run the same test again after. Check the mobile score specifically, not desktop, since most shoppers browse on a phone.
Strip EXIF data and clean your media library. Every photo from a phone or camera carries EXIF metadata: camera settings, sometimes GPS coordinates, sometimes copyright details. None of this helps a visitor viewing the image, and it adds unnecessary kilobytes to every file. Most compression plugins strip this data under an aggressive setting, so check that yours has the option turned on. Separately, scan your media library for images left behind by deleted posts or old campaigns. Unused files still count toward storage and slow down your backups.
Write real alt text, not keyword stuffing. Give every meaningful image a file name that describes what it shows, and write alt text the way you’d describe the photo to someone who can’t see the screen. Skip alt text entirely on purely decorative images like spacers or background flourishes, and leave the attribute empty instead of filling it with keywords. An empty alt attribute tells a screen reader to move past the image silently, which is the correct behavior. A keyword stuffed attribute on a decorative image only adds noise for the exact users that attribute exists to help.
Know what cloud compression tools do with your files. Some compression plugins process images locally on your own server. Others upload your files to a third party server for compression, then send back the smaller version. Cloud processing often compresses harder and faster, since the provider runs dedicated infrastructure built for that single job. The trade-off shows up in where your data travels. A site handling private client photos or anything under a confidentiality agreement needs to disclose outside processing in a privacy policy at minimum. Check whether your plugin processes locally or in the cloud before installing it on a site with sensitive images.
Consider different crops for different screens. WordPress serves a smaller version of an image to a smaller screen automatically, but that’s still the same crop, just scaled down. A wide banner that looks right on a desktop screen sometimes cuts off the subject entirely on a narrow phone screen. Setting up a genuinely different crop per screen size takes manual work in your theme, and it pays off specifically on hero banners and homepage headers where composition matters as much as file size.
Optimize for AI search, not just Google. AI powered search tools and chat-based assistants now pull images directly into their answers, and they lean heavily on the text surrounding an image to decide which one to use: a caption sitting under the photo, a heading right above it, a paragraph explaining what the image shows. A clear caption near a how to image raises the odds an AI tool references it. Keep this in mind before stripping every trace of surrounding text from your media library in pursuit of a smaller page.
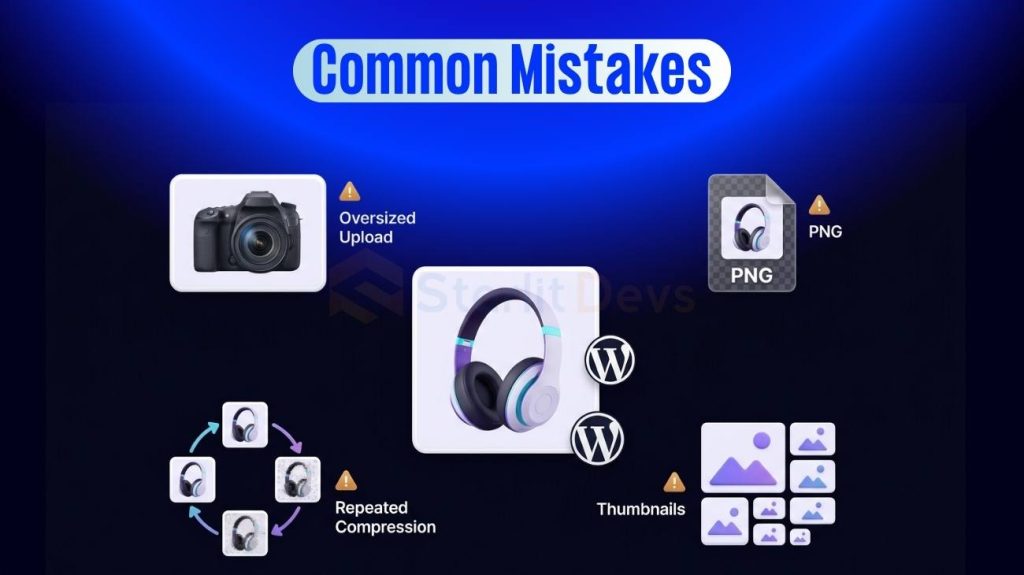
Common Mistakes Store Owners Make
- Uploading images straight from a phone or camera. Modern cameras produce large files by default. Resize and compress before they ever reach your media library.
- Using PNG for every product photo. PNG earns its place for graphics and transparency, but product photos almost always compress better and look just as sharp as WebP or JPEG.
- Compressing the same image repeatedly. Running lossy compression on a file more than once gradually degrades quality with each pass. Keep an original master file untouched and compress a copy instead.
- Ignoring the thumbnails WordPress generates. Your original upload isn’t the only file on your server. WordPress creates several sizes automatically, and all of them need optimizing, not just the one you uploaded.
Final Thoughts
Image compression reduces file size without giving up the visual quality your site needs. For any WordPress site carrying product photos, blog images, or galleries, getting this right cuts page weight and speeds up load times in a way few other changes match.
A solid strategy starts with the right format, resizes images before upload, and applies the compression method that fits each type of image. Add a CDN, set up lazy loading correctly, verify your results with a real speed test, and write alt text that actually helps someone using a screen reader. None of these steps demand a big budget or a developer on staff.
Large, uncompressed images sit near the top of almost every list of what slows a WordPress site down. Build compression into your regular publishing habit, and your site gets faster with every new post instead of slower.
FAQs
Will compression make my images look blurry?
Not at sensible settings. Visible artifacts show up once quality drops too low, typically below 60 for WebP or JPEG. Stay in the 70 to 85 range, and the compressed version looks the same as the original on a product page. If you spot degradation, the setting is the problem, not compression itself.
Should I use PNG for product images?
No. The old rule that PNG is required for transparency no longer holds either. WebP supports transparency at a fraction of PNG’s file size, so even transparent product cutouts compress better as WebP. Save PNG for source files you plan to keep editing.
How do I know if images are the problem on my site?
Run your product page through PageSpeed Insights and check two things: whether the Largest Contentful Paint element is an image, which it almost always is on a store page, and whether the audit flags properly sizing images or serving images in next-gen formats. Either flag means image optimization is your highest value fix.
Is AVIF better than WebP?
AVIF compresses harder, often 20 to 30 percent smaller than WebP at matching quality, and browser support has closed most of the gap that used to hold it back. The trade-off is slower encoding and spotty support across WordPress plugins. WebP stays the practical default. AVIF earns its place on image-heavy stores chasing every remaining kilobyte.
Can I compress images in bulk on WordPress?
Yes. A bulk compression tool scans your entire media library, including every thumbnail size WordPress generated, and processes them without requiring you to re-upload anything. Most tools also skip files already compressed, so running a bulk pass a second time only touches what’s new since the last run.

Founding Starlit Devs has allowed us to extend our expertise globally, serving over 500 clients, including Fortune 1000 companies, with custom web development services. Our commitment to delivering exceptional design and development is coupled with a deep understanding of SEO, which has been pivotal in empowering businesses to achieve maximum online engagement and brand growth. At Starlit Devs, we take pride in our mission to provide websites that stand out in a competitive digital landscape and drive tangible results for our clients.
